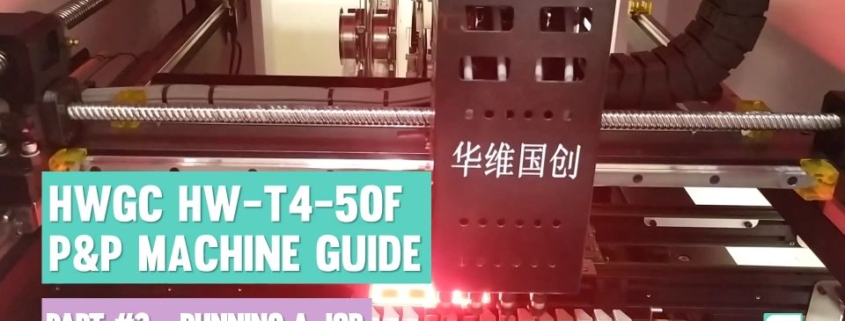
We recently made a few tutorial video on how to use the HWGC HW-T4-50F pick and place machine and they are made available for viewing on YouTube. We love our pick and place machine very much but we also at the same time wished it had more detailed documentation and manual. After more than a year of using the machine, we got pretty familiar with the machine’s in and out. We felt that the machine in overall is an excellent piece of investment. We started to make boards way much faster and spent so much less time on manufacturing. The machine software is quite intuitive but has it’s own quirks and some untranslated parts. We are not going to talk a lot on this post but will allow the videos do the talking. We hope you guys find the videos helpful and if you like them, please give them a big thumbs up! If time permits, we will add a few more videos on the machine like camera & nozzle calibration and footprint library.
https://www.rocketscream.com/blog/wp-content/uploads/2021/11/HWGC_HW-T4-50F_PP_Guide_Part3-RunningAJob.jpg540960LIM PHANG MOHhttps://www.rocketscream.com/blog/wp-content/uploads/2016/02/logo.pngLIM PHANG MOH2021-11-22 19:24:442021-11-22 19:24:46Video Tutorial on Our HWGC HW-T4-50F Pick and Place Machine on YouTube
It has been a while since we have written anything. The past 1 year and half would go on into the history book as a big reminder to human on how fragile we can be despite the advancement we have in technology. We spent a big portion of our time indoor working on new designs, tweaking old designs and taking in custom works during this tough time. This is probably the only way we could keep ourselves sane. We have some new boards available and some had to be shelved at least for now due to the semiconductor components shortage. So, let’s dive in on the new puppies!
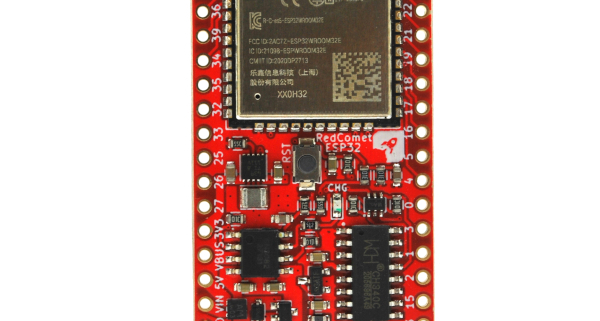
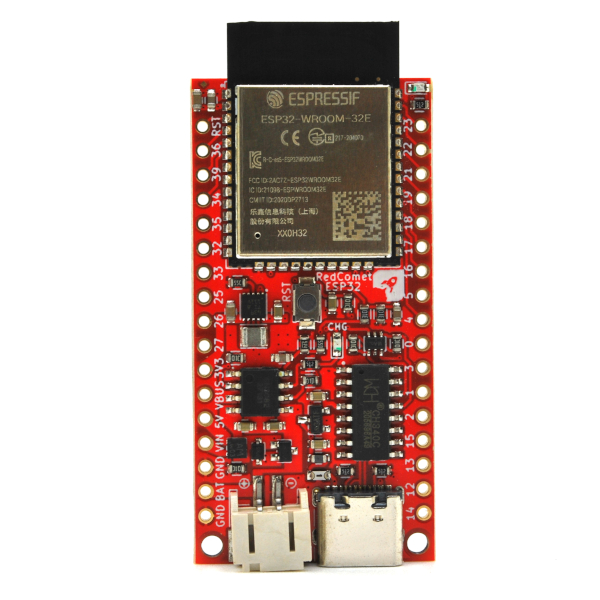
Red Comet ESP32
We have to admit that we have never touch an ESP32 or the earlier ESP8266 until about half a year ago. A long time customer of ours wanted a custom design based on the ESP32. But, we can’t wrap our head around the idea that the ESP32 actually get reset when it wake up from deep sleep. This mean, the processor will actually reboot and start operating from the beginning of the code. This was the sole reason we didn’t explore more on the ESP32/ESP8266. But, granted that this a request from our loyal customer, we took the challenge swallowed our ego and went on to complete the design. The design was a success and customer deployed them on the field with great result. Then, we thought why not an ultra low ESP32 power board for the masses? But, there’s probably thousands or at least hundreds of ESP32 design board out there. We knew what features we exactly wanted on this new ESP32 based board and the Red Comet ESP32 is the humble result.
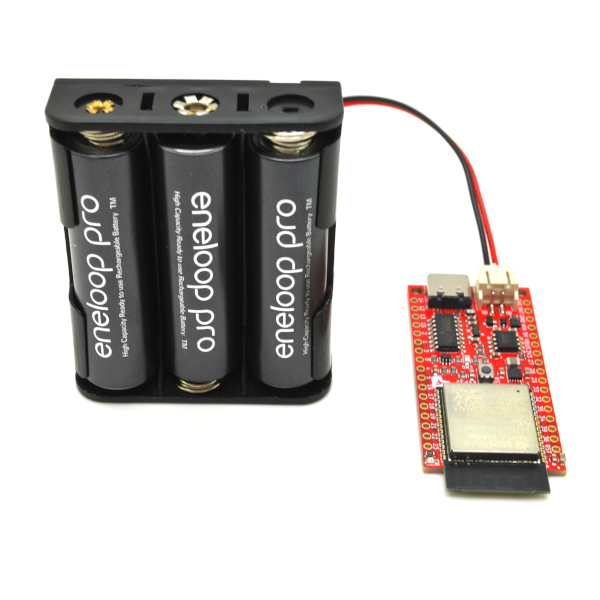
Over the years of selling ultra low power boards, we came across many customers that wanted support for more variety of battery chemistry. Not every single application should or could use Li-Ion or Li-Polymer batteries. For example, If you are somehow living along the Earth’s equator under the hot sun 365 days in a year, a LiFePO4 batteries might be a better solution due to it’s better chemical and thermal stability. There are also other reason like capacity, availability and cost that comes into the picture especially if use a lot of them. Here are some of the highlights of the Red Comet ESP32:
Supports various battery type, cell combination and chemistry such:
Ultra low power: down to 13.0 μA in sleep mode with input at 3.6V (rechargeable battery version) and minimum 10.0 μA in sleep mode with input at 3.6V (non-rechargeable battery version)
Robust and reversible USB type C connector
Fits on a single breadboard for rapid prototyping
Optimized for solar panel charging by employing a battery charger mimicking MPPT
There are some trade-off that we had to take on the design like using the cheaper WCH’s CH340C USB-serial IC instead of Silicon Labs’ CP2102N. This resulted in a slower maximum baud rate at 115200 bps but that allows us to keep the board price lower. We also have to drop support for NiMHx2 battery configuration due to the high peak current consumption of the ESP32.
ATMega4808 Based Mini Ultra
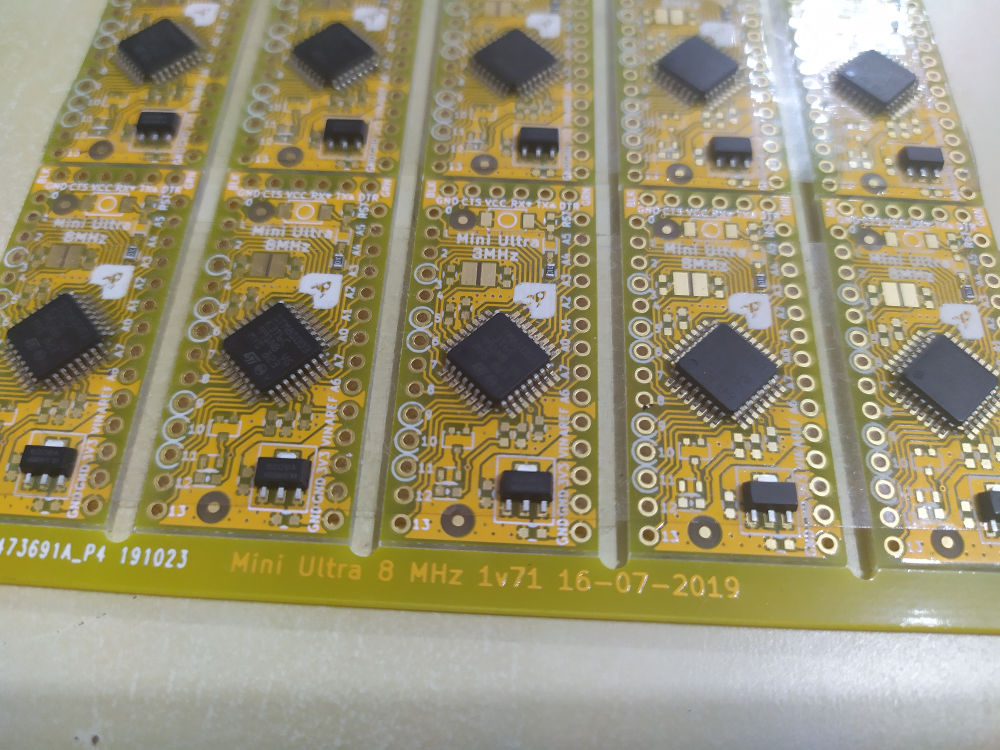
For those that have been following us over the years will know that one of our earliest design was the Mini Ultra 8 MHz. The Mini Ultra 8 MHz was based on the ATMega328P which we all love for it’s simplicity but yet very capable. But, one of the ATMega328P Achilles heel was it’s smaller RAM size and limited 32 kB of program flash. When the Arduino team first uses the ATMega4809 from the new megaAVR-0 microcontroller series on the Arduino Uno WiFi Rev2 board, we thought that this could be a good candidate to replace the ATMega328P although it comes with a lot more pins that we need (48-pin vs 32-pin). That would not fit into the Mini Ultra 8 MHz existing board form factor. But, it wasn’t long before Hans (aka MCUdude) came up with the MegaCoreX Arduino board package to support the entire megaAVR-0 microcontroller line-up. This adds a total of 8 (with different pin count variant) microcontroller from the megaAVR-0 series to be used in Arduino development environment. From that list, we felt that the ATMega4808 is the best candidate to replace the aging ATmega328P. It has 16 kB more program flash, 4 kB more RAM, 2 extra hardware UART, real time counter (RTC) and can run without any external crystal (in fact it can’t drive any external high frequency crystal). At the same time, we wanted to give the flexibility of powering this new Mini Ultra just like what we did with the Red Comet ESP32 and hence equipping the board with an ultra low power buck-boost converter. This would allow the use of power source lower than 3.3 V (down to 1.8 V) to power the board which includes more common AA alkaline batteries configured in 2 or 3 series combination or the LiFePO4. The board comes pre-loaded with an Optiboot bootloader which allows you to load code from the Arduino IDE by using your regular USB-serial adapter. And as usual, the board is ultra low power and only consume 4 μA in sleep mode.
UPDI-USB-Serial Adapter
The new megaAVR-0 series departs from the classic AVRISP programming interface by replacing them with a simple 1-wire bidirectional programming interface called the Unified Program and Debug Interface (UPDI). This means your regular AVRISP won’t be able to program these newer megaAVR-0 series microcontroller. Microchip/Atmel’s ICE programmer is UPDI capable but it is not that affordable. ElTangas did an awesome job by writing a software JTAG to UPDI interface that was originally targeting using older and existing JTAG interface like the JTAGICE from Atmel to mimic this new UPDI interface. The code written by him can be run on a regular ATMega328P (or any of it’s variation with some modifications) and from that you will get an UPDI programmer that can also be accessed from the Arduino IDE. We took the classic ATMega328P overclocked to 16 MHz while running it at 3.3 V to run the UPDI programmer code and coupled it with a dual port USB-serial IC (Silicon Labs’ CP2105). Having a dual port USB-serial configuration would allow one of the port dedicated as UPDI programmer and the other as your regular USB-serial interface. If you already have a bootloader installed on any megaAVR-0 microcontroller like our ATMega4808 based Mini Ultra, you can use the USB-serial port to upload code from the Arduino IDE. But if you want to load the code without the use of any bootloader (example: for reason like saving program flash memory) , then the UPDI programmer can be used.
There you go, a mini update of our new products. We hope you find them useful for your projects and applications.
Back in August 2018, we got ourselves a desktop pick and place machine from China (there’s a reason why we didn’t talk about this earlier, read on). We wanted to speed up our in-house production that was only equipped with a mighty tweezers. Limited by a small budget and space constraint (plus a door width of 80 cm), we went on to look for one. We knew exactly what we want and here are some of the requirements:
Vision system for parts alignment – without vision system to correct misaligned components, there will be too many manual touch up work by hand
Supports different nozzle sizes for various component size to be able to complete a job without stopping to change the nozzlemanually – most lower cost machine comes with either single or dual head that holds 1 or 2 nozzle at a time, therefore a nozzle changer is needed
Enough feeders to support most of our BOM lists – the boards we made have BOM lines as low as 10 going all the way up to 40 different types of components where mostly comes in 8 mm tape width reels and remaining in 12 mm and 16 mm tape width reels.
Support loose components in tray – as we don’t build boards in the thousands at a time, costly parts like microcontroller and power management controller comes in either the format of tray or a reel of 1K to 5K. We couldn’t afford a full reel and hence tray was the only option for us or pay some fee for re-reeling services like those offered by Digikey or Mouser.
Support components in tube packaging through vibration feeder – some components comes in tubes and components in this packaging can be loaded using a vibration feeder
Budget – we can only afford to fork a maximum of USD5K so we limit our purchase within that amount
Size – not too big, too heavy and it must be able to go through our 80 cm width door
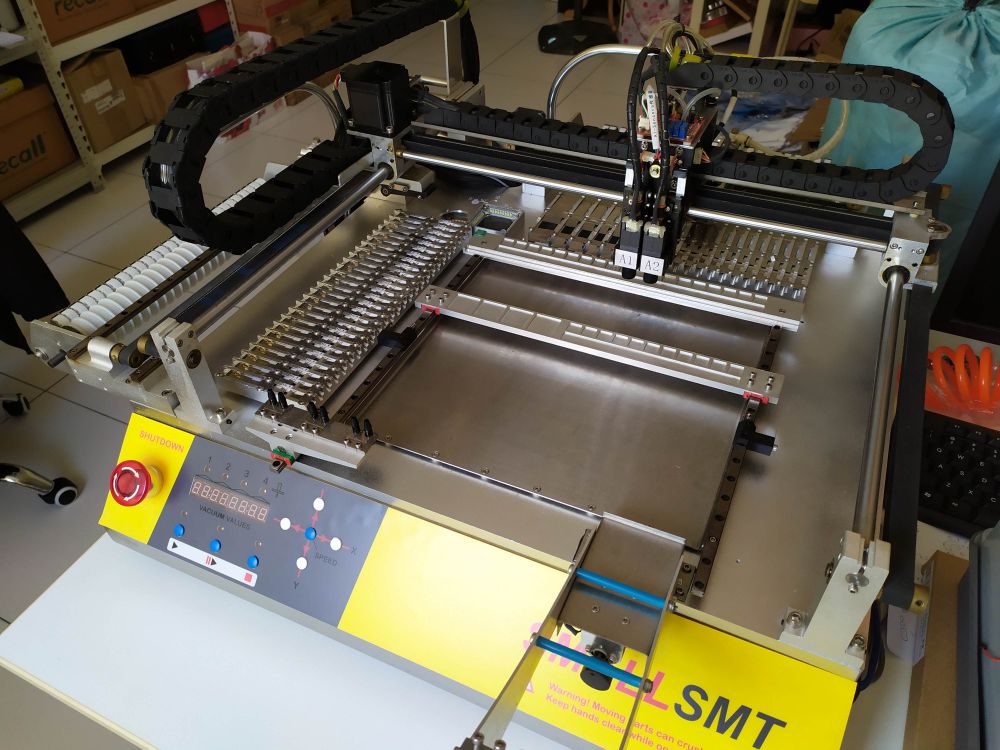
Smallsmt VP-2500D desktop pick and place machine
It is a dual-head with vision system desktop pick and place machine with push feeders from SmallSMT. So we shipped a chunk of money over the South China Sea and waited for about 3 weeks for the machine to arrive. We arranged our own shipment from China to Malaysia by sea as it was a lot cheaper and it takes only a week to arrive. Surprisingly here in Malaysia, pick and place machine is exempted from taxes. We were hoping that it could speed up our assembly process so we could concentrate more on the development work of our products. We were so excited when we first received the machine and to play around with it. After tinkering around with the machine for few weeks, we are pretty much familiar with the software and process involved. But, this is when we started to run into many issues on the machine. Here are some of the issues we came across:
Main board went kaput – The very moment we installed the vibration feeder that comes with the machine, it started to make a loud noise and that is when we knew something was not right. It turns out that the driver of the vibration feeder located on the main board is damaged and is driving the motor on the vibration feeder well beyond it’s maximum rating. SmallSMT told us it was due to the short circuit caused by the vibration feeder metallic body. We find this rather absurd because there was isolation between the vibration feeder electronics and the chassis of the pick and place machine. Anyhow, they sent us a replacement main board albeit it sure looks like a board that has been used before and repaired judging from the amount of flux residue from hand soldering on the new main board.
North feeder working inconsistently – A bulk of our time spent on the machine was on configuring the push feeder. It is at best described as “fiddly” and “inconsistent”. It would work perfectly during the setup process, but would then fail to accurately advance the tape of reels during normal operation. This resulted in countless halted job anytime in a pick and place job. But, what baffled us was why it would run almost perfectly on the west feeder but not on the north feeder? We tried every tricks and method suggested by SmallSMT but most of the time it would work fine for a short while before going back to it’s old self. We desperately need the north feeder because there is where our components that comes in 12 mm, 16 mm and 24 mm tape width reels can be installed. Even more shocking, SmallSMT told us the 24 mm feeder is actually not supported! Why sold it to us at the first place?
Reel cover tape snapping way too often – The machine uses a push feeder (instead of a drag feeder) to advance the component reels. A mechanical cover tape peeling mechanism will pull the cover tape towards the back to expose the component to the pick and place head. How tight or lose the tension on the cover tape can be adjusted to one of the 3 settings on the machine. However, even at the least tight setting, the cover tape on our component reels snap way too often. Again, this resulted in countless stop on the pick and place job.
Some feeder pick up locations are not reachable by the top camera – In order to configure the pick up location, we need to move the head manually to the pick up location without vision assistant. This process needs trial & error and we spent a lot of time here. The vibration feeder is one of the location not accessible by the camera on top of few other push feeders.
North feeder location not accessible by the head – this is one of the most shocking issue we faced on the machine. When we try to move the head to any of the 8 mm tape width feeder on the north side, the software will complain it is not reachable. A solution given by SmallSMT was to shave off a portion of the y-axis limit end stop. We reluctantly shaved off 2 mm from the y-axis limit end stop metal piece. Even though this solved the problem, we start asking our self, isn’t the machine calibrated and tested at the factory to detect such issues? Or it was not even calibrated? After the fix, the top camera will no longer park at the machine origin (indicated by a engraved mark on the machine bed) when the homing function is executed. An offset of 2 mm was also needed on the software to tell the machine everything has been moved by 2 mm on the y-axis.
After spending few months on the issues of the machine, we went back to the tweezers. We have since put the machine on sale on the EEVBlog forum and if anyone feels that they could make full use of the machine better than us, drop us a mail. We have sold the machine to a gentleman in Romania.
Re-tuning our requirements
When we decided it was time for us to look for a second pick and place machine, we narrowed down our list to a few machine sub USD10K prices (we decided not to be fully limited by our budget). We have since tweaked our initial requirements for our machine:
Removable feeders – it is our mistakes on our first purchase to think assume that fixed feeders are easily manageable and reels can be swapped in and out without much trouble. Oh boy, we were so wrong.
Industry proven removable feeders – removable feeders are expensive, full stop. The total cost of the feeders alone could easily equal that of the machine cost. By having machine with industry proven feeder, we will not be locked down held ransom to a propriety feeder made by the machine manufacturer. This bring us to the tested and proven pneumatic Yamaha CL feeder that were used on the Yamaha YV and YG series machine. There are still abundance of these machine available in the 2nd hand market and they are built like a tank. A lot of newer machine from China uses these Yamaha CL feeder due to it’s reliability, robustness and cost. If you dig deep and spend some time looking, Yamaha Cl feeder can be had as low as USD40 for variant supporting 8 mm tape width. In the 2nd hand market, we found some retailing at USD15. Obviously, these feeder even brand new ones are no longer original feeder made by Yamaha but clones. However, due to it’s simplicity (at least in the feeder design world), they are copied to perfection.
As many head as possible – we figured out that having an automatic nozzle changer is a very cool feature but it also introduces another problem (at least on our previous machine). Whenever a nozzle is being changed, this introduce some amount of error and deviation due to the fitting of the nozzle to the head. 4 heads is minimum and 6 & 8 heads is widely available for larger machine. Based on our BOM of various designs, having 4 different nozzle is enough to complete a pick and place job without changing the nozzle.
Conveyor belt – we think this is a very convenient mechanism to load the PCB onto the machine. Having to place the PCB to a fixture manually is really time consuming. Furthermore, if we decided to expand our manufacturing lines, we can cascade several machine in the same line or add automatic stencil printer with reflow oven that comes with conveyor belt too. This is not possible if the conveyor belt feature is not available.
Widely used by factories and not some Youtuber – this is one of the mistake we made and this is one of the reason (if not the most important reason) on which machine we ended up with the 2nd time around. As we dig deep into the small scale PCBA manufacturing in China, we do notice many of these factories are either using 2nd hand machine like those older Yamaha (YV/YG), Juki, Samsung, etc machines or brand new made and designed in China machine. Due to the space issues, we obviously cannot fit a big machine like those 2nd hand machine. While those brand new made in China machine comes in variety sizes and specifications.
As many feeder as possible – no feeder is too much.
Potential candidates
After some extensive research we narrowed down our candidate list to the machine listed below. They are all desktop/benchtop machine that could go through our 80 cm door.
* flyby vision camera ** using optional electrical feeder *** maybe over specked advertised **** FOB destination (to Malaysia) supplied by Glichn (HWGC reseller for export market)
A trip or two to China
As we are based in Malaysia in the center of South East Asia, we are spoiled with cheap flights to China. This allows us to go on short trips lasting 2-4 days for few hundred dollar. We went to Shenzhen, China back in August 2019 and another trip to Beijing, China back in December 2019 (yes! when CoVid-19 was still not considered a worldwide threat).
Shenzhen August 2019
A super short trip of 2 days 1 night jammed packed with machines to evaluate. The trip basically consist of 2 parts spread across 2 days:
Shenzhen NEPCON 2019
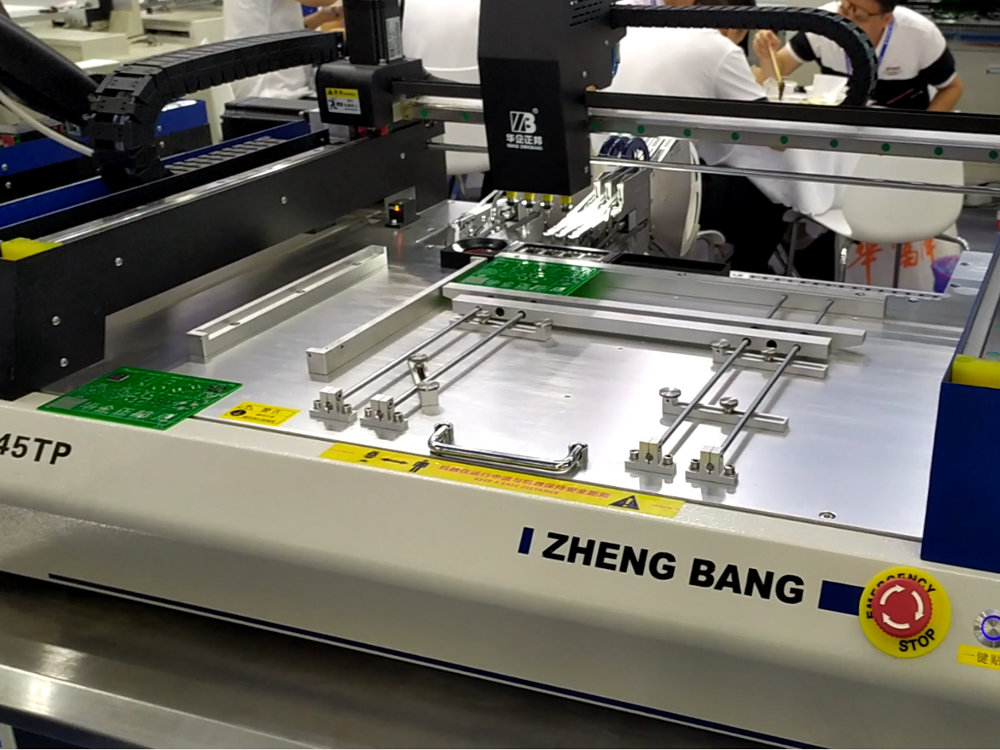
We always made it a habit to travel light even when travelling abroad. The first thing we did after taking the subway from the Shenzhen airport to the city was checking out the exhibition due to the time limitation. That lightweight backpack made it possible to move around such a big venue. This is where we get to check out several machines that we were interested in. We knew ZhengBang and Charmhigh were going to exhibit there on top of the regular big boys like Yamaha and Juki. It was nice to actually meet the people from Wenzhou ZhengBang and checking out the ZB3545TP. This is one of the earliest machine we look at due to it’s size and it’s easy to use software. It was not due for release at least until the exhibition at Shenzhen NEPCON 2019 in August 2019. The sales representative were not giving much information other than it support 38 feeders (8 more than the existing ZB3545TS), 4 mounting head, 4 small camera for small components and a larger higher definition camera for larger components. We were told it was going for a special pricing of USD4500 during the exhibition. Little that we know that this newer ZB3545TP is a belt-driven machine unlike the ZB3545TS that is ball screw driven until we actually saw it in person. This left a bad first impression on how after sales and support might shape up if we were to buy one. We actually spent a lot of time on learning their machine software posted on YouTube and it is probably the easiest of the lot to use. But again the deal breaker here was how we were not informed in advance about the belt-driven system on the ZB3545TP and also the removal of the simple and repeatable nozzle calibration process that were employed on the older ZB3545TS. At the end of the exhibition, we decided that the ZB3545TP was not for us.
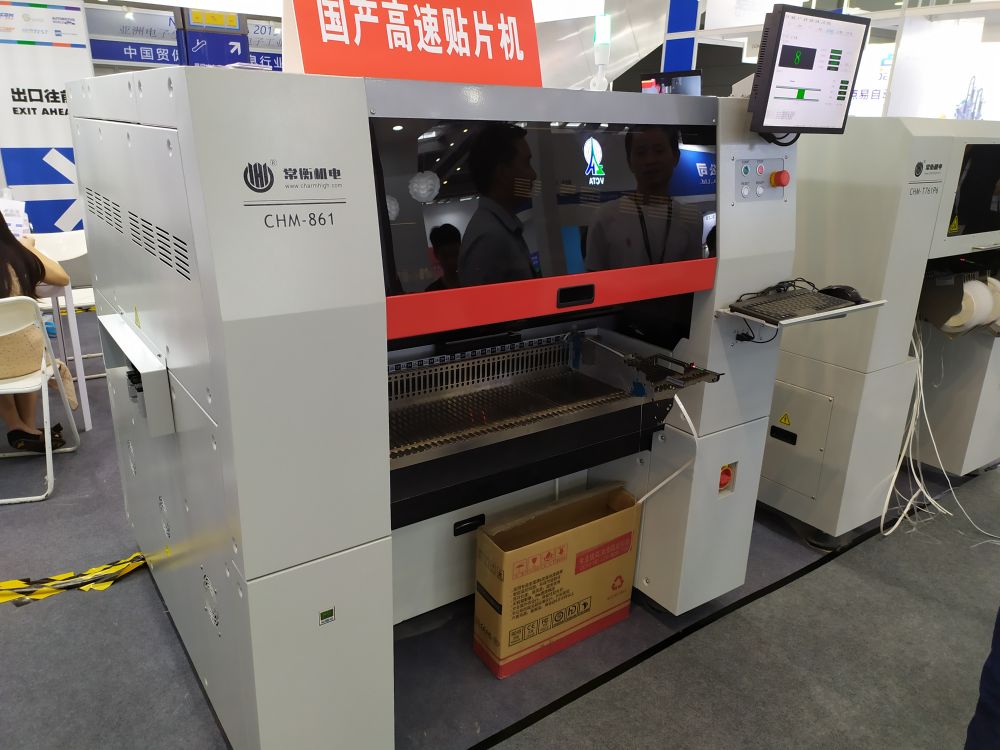
There are other similar sized companies like Charmhigh at the exhibition offering similar sized machine but before the trip, we did ask them on whether they would release any new machine or any upgrade plans on their existing benchtop machine like the CHMT560P4 which has 60 feeders capacity. The answer is pretty straight forward in which they said they are concentrating on larger machine and benchtop machine are no longer a priority. That is when we decided to skip putting any effort on checking out their machine. But their new CHM-861 flagship monster machine sure looks promising.
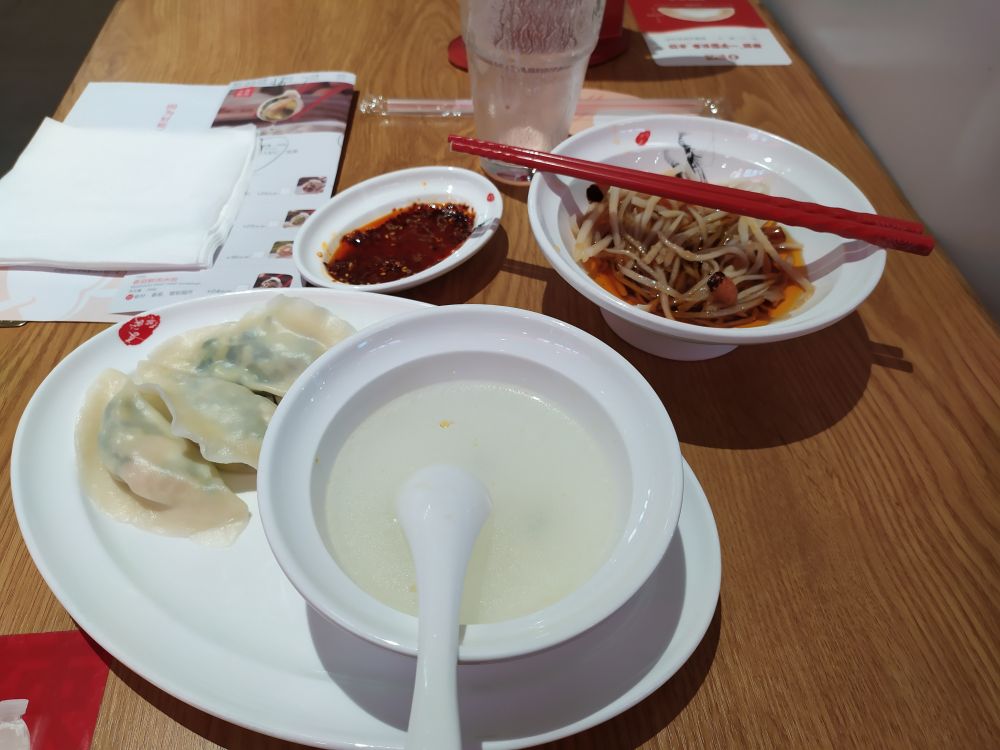
The regular big player was present at the exhibition like Yamaha, Juki and Autotronik just to name a few. But, their offering is beyond our budget and dimension requirements. We left the exhibition before the sun sets in a disappointing manner. But, in a way we managed to cross out one of the machine candidate out of the list. We ended the day with a warm bowl of dumpling before hitting the sack after a long day (we traveled from midnight the day before!).
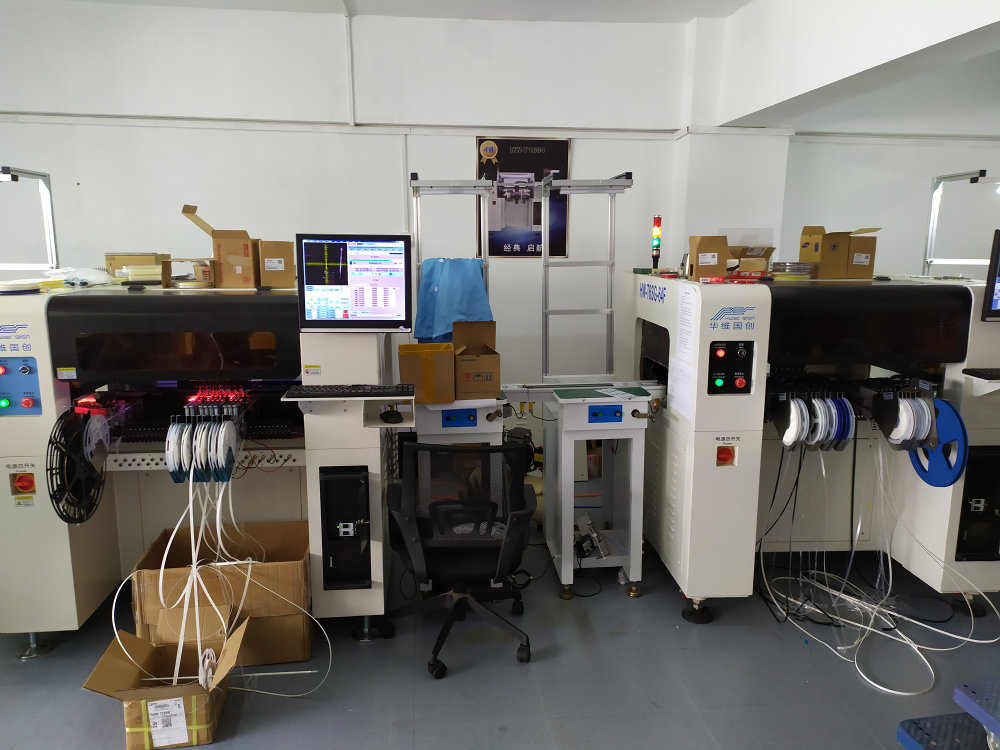
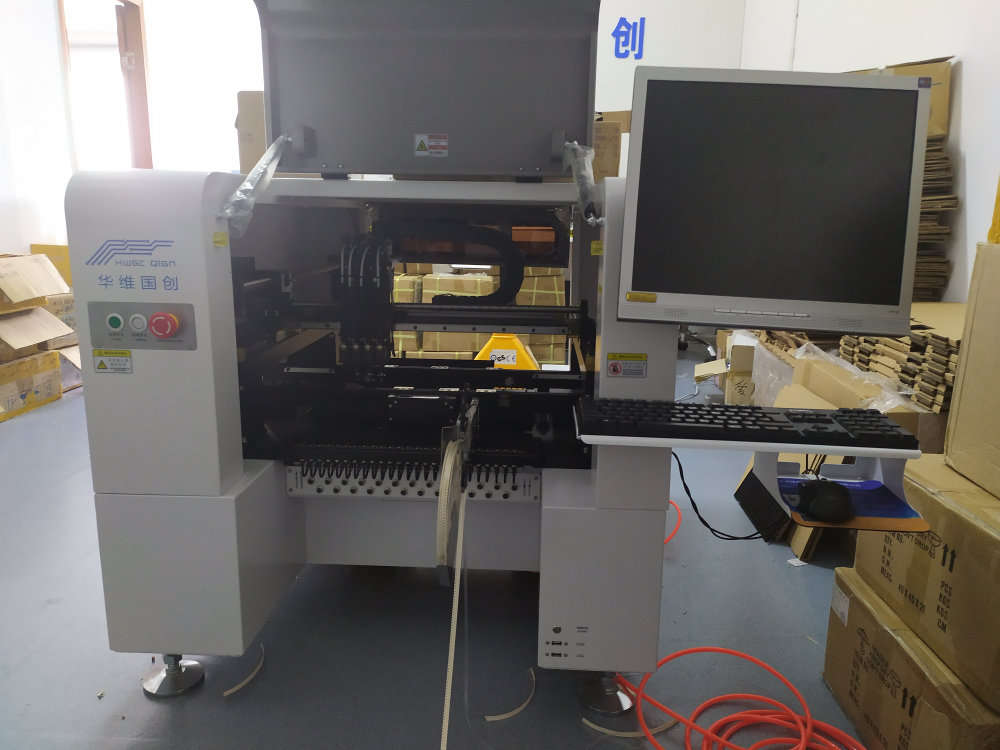
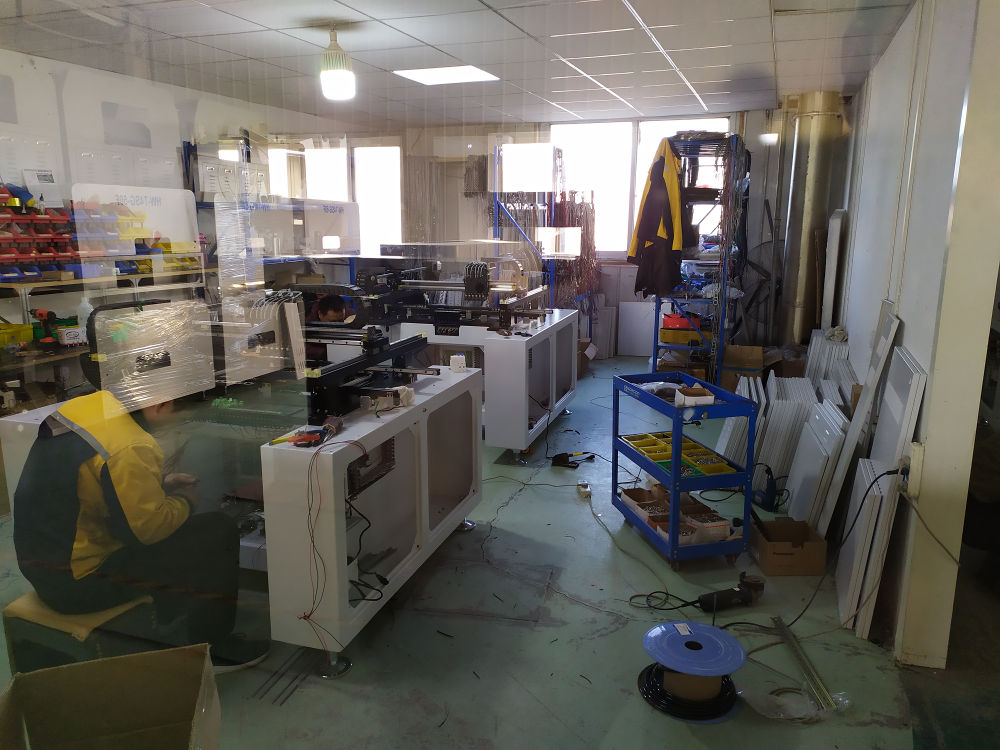
Huawei Guochang (HWGC) is fairly unknown to anyone outside of China at least a few years back. Their machine are mostly sold outside of China by reseller such as Wenzhou Yingxing Technology and Beijing Glichn. This allow their machine to be easily purchased outside of China through e-commerce website such as Alibaba and Aliexpress. We first contacted Wenzhou Yingxing Technology to inquire about the HW-T4SG-50F (sold as SMT550 by them). When they know that I was going on a trip to Shenzhen, they mentioned they have a factory in Shenzhen that we can drop by to look at the SMT550 and other bigger machine like (SMT660 and SMT880 which are all rebadged machine made by Huawei Guochang). On the morning of the 2nd day of our trip, we got up early and hit the subway plus taking a DiDi for the first time in China (your Uber and Grab in China) to the factory. Upon reaching the area of the factory, we were searching for at least 15 minutes because there were no company sign board to be found. We were lucky as some friendly people working in one of the building that we entered wrongly managed to figure out which factory building we wanted to go. To our surprise when we reached the front door of the factory, we were greeted by a big HWGC signboard. That is when we get to know that we are actually visiting a HWGC mini showroom or sales office in Shenzhen!
We were greeted by representative name Mr Guo that runs the place. Instead of using the sales office just for displaying their machine, they actually run a small production house there. They have a unit of their 6 head 64 feeders machine (HW-T6SG-64F) and an 8 head 80 feeders machine (HW-T8SG-80F) cascaded in line equipped with a semi-automatic stencil printer. They were assembling a batch of ESP8266 boards with components size down to 0.4 mm pitch and 0402 passives. As all their machine supports electrical feeders (ask for it when ordering if you need one), the larger 80 feeders machine on the left were loaded with electrical feeder to handle smaller components while the 64 feeders machine on the right were loaded with regular pneumatic feeder for larger components. We managed to observe how good the placement of components are with these machines and most components were spot on sitting on where they should and only occasionally a component or 2 in a panel sitting slightly off but the reflow process would nicely tuck them back into position for such small displacement. We are impressed because it was running at full speed (more than 10k CPH)!
Of course our trip was not about these bigger boys, unfortunately. The machine that were looking at were just released about a month or two but luckily a new unit just came in few days ago. Unfortunately, they have yet to setup the new machine. But, not all is bad news as we get to measure the dimension of the machine in real life to ensure it goes through our door (remember our 80 cm width door?). We actually like the simple design and how solid the build is.
As we were chatting with Mr Guo, we were surprised that they actually have customers in Malaysia using the machine for production. We left Shenzhen that night itself with more or less knowing which machine we will purchase. But, the dilemma was should we continue to purchase from a reseller that speaks English (somewhat) or deal directly with HWGC? Mr Guo did mentioned they are fine in both situations but we knew there would be a language barrier issue for technical support. As much as we can speak in Mandarin (mostly on how to order food LMAO), it’s a totally different ball game when it comes to technical terms. In less than 4 hours, we are back in Malaysia!
Beijing December 2019
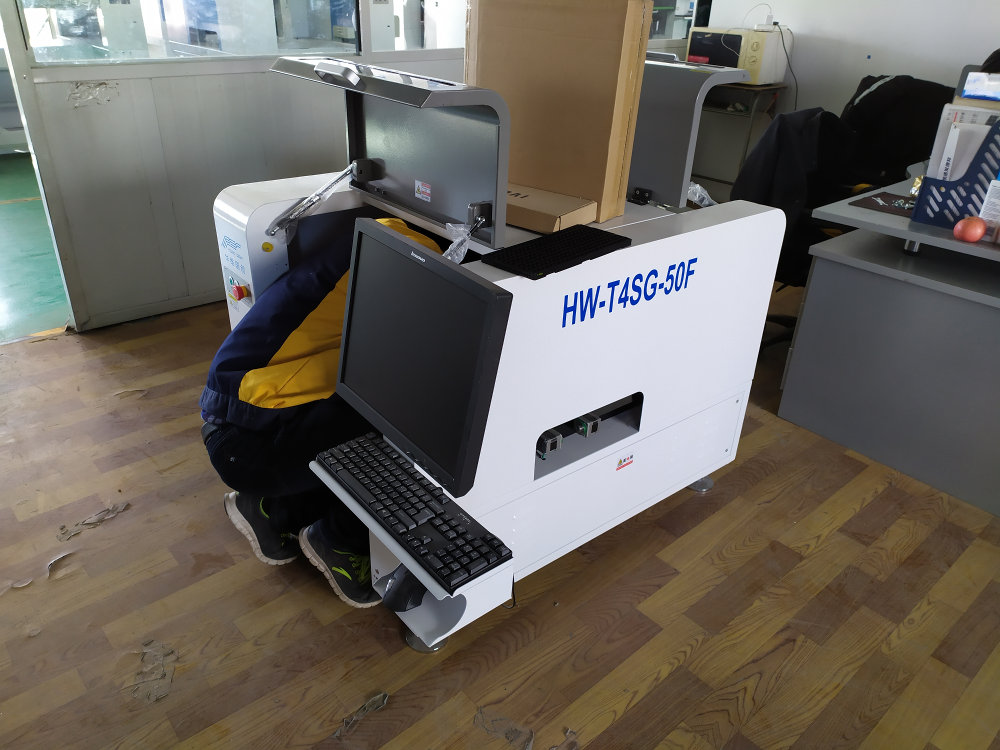
Come December 2019, we had some conversations with Kayo and Boreytech regarding their machines. Both companies were providing us with many videos on machine software usage and real production samples. But, we found out that both machines require an external PC to operate. On top of that, support for using electrical feeder is not out of the box, they need to add them which we believe would not be a neat solution. At the same time, we started to use the Alibaba platform more often to see what other options are available in the China market. Little we know that sellers on Alibaba can actually check out on which customer has been browsing their products. This brought us to a HWGC reseller company called Beijing Glichn that were selling the HW-T4SG-50F as GP400 at a cheaper price than other resellers of the same machine. They offered to bring us on a HWGC factory tour in Beijing. Coincidentally, all three companies (HWGC, Kayo, Boreytech) are located in Beijing, China! That was when we decided that we needed to hop on the plane again.
We told remind ourselves that we need to actually try out the machine candidates with our very own PCB this time around. This proved to be a tough ask but doable. We knew how strict China custom is in bringing in stuff into China. It would definitely look weird to bring some electronics components (in reels!) into China when bulk of them are produced there. We selected our simple Mini Ultra 8 MHz PCB to test them on the machine in China. Instead of bringing our components from Malaysia, we purchase them in advance from Taobao and sent them over to the HWGC factory. We basically bought:
A used TQFP-32 JEDEC tray for RMB1! Shipping was RMB25 though using fast express
10 pieces of unknown STM MCU in TQFP-32 package similar to the ATMega328P used in our board. IC will be loaded onto the JEDEC tray.
A reel of 10K 0603 resistor that will be loaded on an 8 mm feeder.
A reel of XC6206P332PR regulator in SOT-89 package similar to the MCP1700T-3302 used in our board. Reel will be loaded on a 12 mm feeder.
We reached Beijing on a cold sub zero morning that was so uncomfortable for someone that lives under the hot sun 365 days in a year. Alas, after dropping off our already light backpacks at our Airbnb, we jumped onto the subway and traveled as far as the subway line could bring us to the north of Beijing. At the last station, a sales representative name Ms Karen Peng and her colleague from Beijing Glichn picked us up to the HWGC factory. We were greeted by the engineers at the HWGC factory that were suit up with their company yellow and black windbreaker (wondering why they didn’t paint their machine in that color which would be very cool) and a stash of yet to be assembled machine frame/body.
They have prepared a machine to test out our PCB. We also noticed that all our components purchased from Taobao has arrived safely on the premise prior to our visit. The engineer took about 15 minutes to set up our PCB and did a trial run of mounting process. We managed to observe on the flow of work to use the machine. Although we brought our PCB pick and place file with us, the engineer decided to do it manually by specifying the coordinate of the components on a single PCB and multiplying them across the entire panel. It’s amazing how fast he can do it without much fuss.
We did a few runs of the pick and place process (we should have brought more copies of PCB, we ended removing the components from the double sided tape after each run!) and here’s an example of the accuracy. We can say they are mostly spot on, but the direct use of the PCB pick and place file would probably produce an even more accurate result. Again, it’s pretty much mirrored what we have seen at their Shenzhen office on the larger machines.
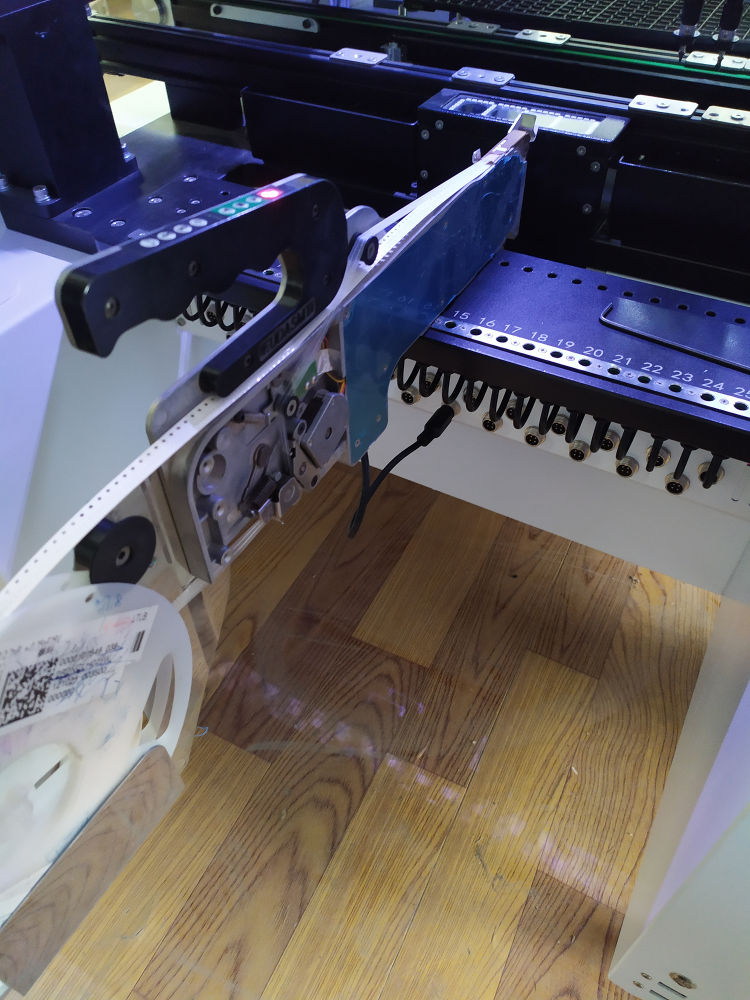
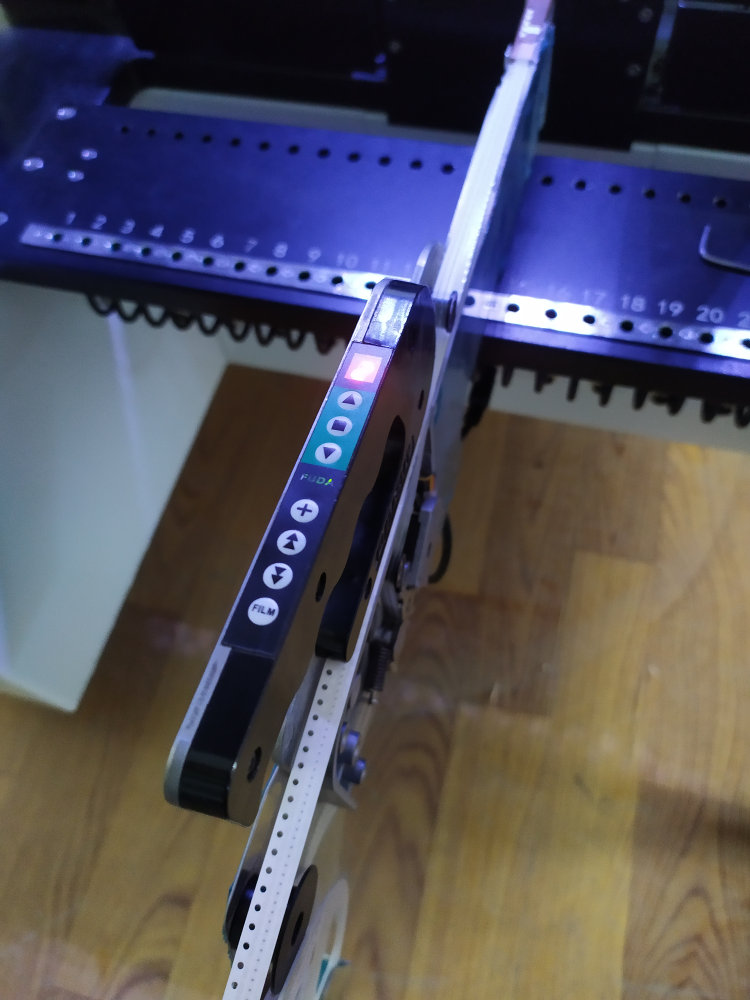
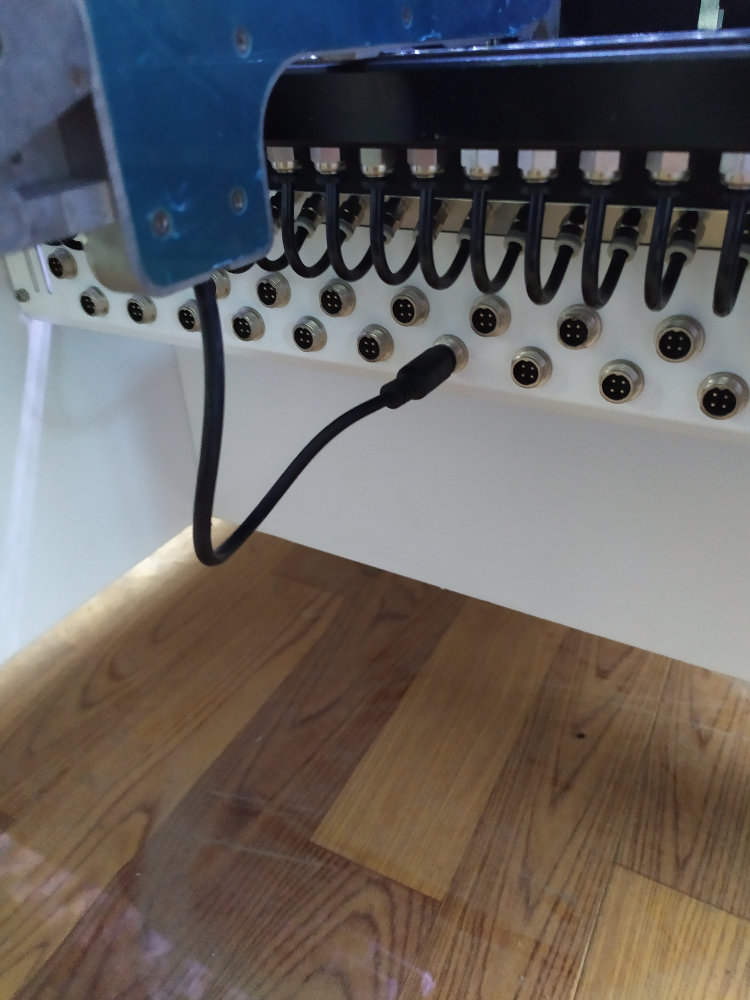
One important feature that we think could be useful for us in the future is the ability of the machine to use electrical feeder. They claimed their machine can pick and place components down to the size of 0201 using their electrical feeder. Here’s a sample of an 8 mm electrical feeder mounted on the machine.
8 mm electrical feeder
Cool LED indicator on electrical feeder
Port supplying power to electrical feeder
After spending about more than an hour, we decided to make a move as we can see everyone is so busy doing something. It’s best to let them to continue on their work. Before we leave, they showed us around their factory. Never in our life, we saw so many pick and place machines!
We left the HWGC factory in an even more freezing condition as night falls. Everything turns dark after 5 PM which was first for us. We wanted to thank Beijing Glichn for making the tour and test possible and they are kind enough to send us back to the same subway station they picked us up earlier in the day. Before we came to Beijing, we left the option of visiting both Kayo and Boreytech factories open although we didn’t make any arrangement with those companies. But after seeing what the HW-T4SG-50F is capable of, we decided not to waste their time on a visit that would not turn into sales. Our heart has already set on the HW-T4SG-50F, suffice to say.
We spent the next 2 days doing touristy stuff like visiting the Great Wall of China and Forbidden Palace. It was an icing on the cake for the trip.
The Forbidden Palace
The Great Wall of China
Tiananmen Square
The Chosen One
We can say that our trip was a success and we finally crossed out all the machines from the list except HW-T4SG-50F. We have decided to purchase them from Beijing Glichn as we knew language would become a barrier if any technical issues arise. The people behind both companies are also very warm and competent in what they do.
Epilogue
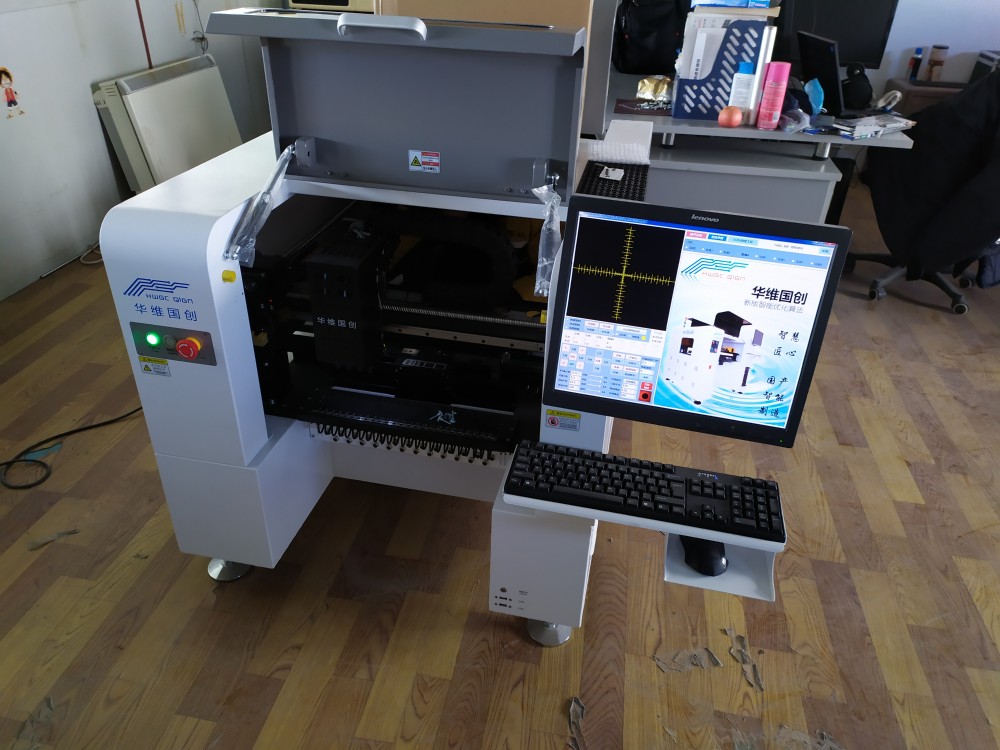
Unfortunately, then came the whole Covid-19 virus pandemic that affects the entire world. We were lucky we came back safely as early as in December 2019, it was reported that the virus was already in its initial stage of spread in China. China went into lock down mode as well as here in Malaysia shortly after that. Everything came to a halt and the future became unclear. Buying a machine would be a big risk and we were holding our wallet tight. Companies downsizing and closing down, people losing their jobs, industries lost its importance and lives are lost more importantly. We decided to put our machine on hold. We would also like to thank our customers, especially those that have been buying from us since ages, that kept us going. Only in late June 2020, we placed an order for a unit of HW-T4SG-50F/GP400. We can’t wait for the machine to arrive and it will be shipped by slow boat to reduce the cost of shipping for something that weighed almost 260 kg. In our next article, we will be writing about our new machine and maybe some videos on the machine, stay tuned!
https://www.rocketscream.com/blog/wp-content/uploads/2020/06/HW-T4SG-50F.jpg7501000LIM PHANG MOHhttps://www.rocketscream.com/blog/wp-content/uploads/2016/02/logo.pngLIM PHANG MOH2020-07-04 01:54:442020-07-05 12:16:17Picking the Right (or Wrong) Pick and Place Machine
We have been working on a single cell Arduino compatible LoRaWAN low power node for some time now. Many who has been following our work has been asking when will the board will be released. We have to admit this is probably one of the simplest board we have ever design but the testing and validation (whether it’s in the lab or in the real world in sub zero temperature) requires so much of attention and patience. We’ll be talking a bit on the ideas behind this board and what motivates us to perfect it in this article. Read more
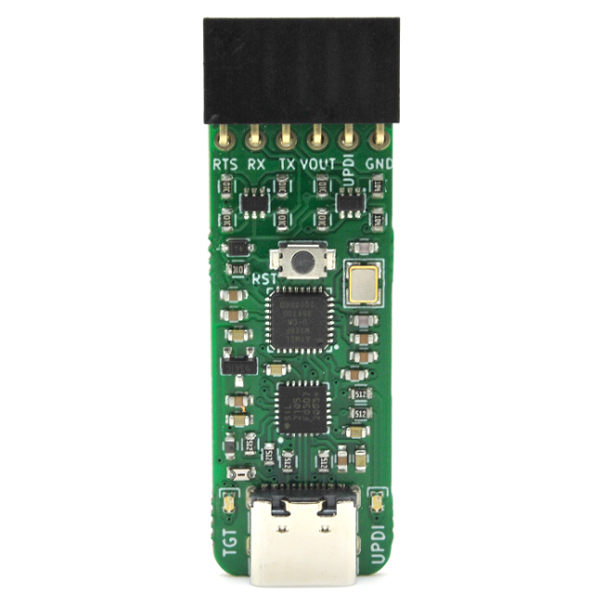
https://www.rocketscream.com/blog/wp-content/uploads/2018/02/DEV-00067-UFL-TOP.jpg600600LIM PHANG MOHhttps://www.rocketscream.com/blog/wp-content/uploads/2016/02/logo.pngLIM PHANG MOH2018-02-21 21:36:432019-09-10 02:14:43Updated & Back in Stock – Mini Ultra Pro V3
We may request cookies to be set on your device. We use cookies to let us know when you visit our websites, how you interact with us, to enrich your user experience, and to customize your relationship with our website.
Click on the different category headings to find out more. You can also change some of your preferences. Note that blocking some types of cookies may impact your experience on our websites and the services we are able to offer.
Essential Website Cookies
These cookies are strictly necessary to provide you with services available through our website and to use some of its features.
Because these cookies are strictly necessary to deliver the website, refusing them will have impact how our site functions. You always can block or delete cookies by changing your browser settings and force blocking all cookies on this website. But this will always prompt you to accept/refuse cookies when revisiting our site.
We fully respect if you want to refuse cookies but to avoid asking you again and again kindly allow us to store a cookie for that. You are free to opt out any time or opt in for other cookies to get a better experience. If you refuse cookies we will remove all set cookies in our domain.
We provide you with a list of stored cookies on your computer in our domain so you can check what we stored. Due to security reasons we are not able to show or modify cookies from other domains. You can check these in your browser security settings.
Google Analytics Cookies
These cookies collect information that is used either in aggregate form to help us understand how our website is being used or how effective our marketing campaigns are, or to help us customize our website and application for you in order to enhance your experience.
If you do not want that we track your visit to our site you can disable tracking in your browser here:
Other external services
We also use different external services like Google Webfonts, Google Maps, and external Video providers. Since these providers may collect personal data like your IP address we allow you to block them here. Please be aware that this might heavily reduce the functionality and appearance of our site. Changes will take effect once you reload the page.
Google Webfont Settings:
Google Map Settings:
Google reCaptcha Settings:
Vimeo and Youtube video embeds:
Other cookies
The following cookies are also needed - You can choose if you want to allow them:
Privacy Policy
You can read about our cookies and privacy settings in detail on our Privacy Policy Page.