Pogo Pin Test Jig for Arduino Shield
Here at Rocket Scream, every boards are tested before being put on sale. When we first started, we have to admit we were awfully ineffective in testing each product that we made. Each test process was time consuming and our method could be described as primitive (imagine rubber bands…).
As we make more and more boards, we need to ensure that the test process is more effective, repeatable, and less time consuming. Most boards or kits have connectors that are not populated during production. For example, a lot of shields in the market made for Arduino are usually sold without the stacking header populated. Some user might want to use different type of connector (header or receptacle) or direct wire soldered to the pads. In order to test shield without basically soldering any connector onto it, we needed a test jig that temporarily provides access to the circuitry on the shield. Our idea was to design a test jig board that could be sandwiched in between the shield board under test and a tester board (an Arduino board in this particular case). We came out with a pogo pins test jig for Arduino compatible shields that we made. Our main idea was to have them reusable for different shield design and flexible in terms of usage. Knowing that we could use pogo pins like those sold by Sparkfun, we went a step further by looking for a surface mount (you’ll see why by end of the post) version. We stumbled upon some surface mount pogo pins made by Mill-Max which is available from Element-14/Newark/Farnell:

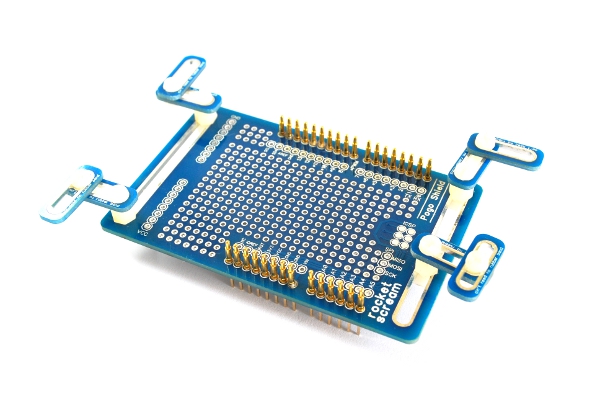
The bottom portion of the pogo shield consists of SMT version of 2.54 mm header that allows the board to be directly plug into a regular Arduino board. 2 long slot holes are added on the left and right end of the pogo shield. These 2 slot holes are used to hold standard M3 spacer which can be moved along the slot holes (very handy if the shield under test have obstruction like components or connectors along the edge). As we don’t have access to a laser cutter, we made the small tiny retainer out of PCB to hold the shield under test firmly onto the pogo shield. These tiny retainer PCB also have long slot holes to allow flexible position adjustment.

As we are using the part 0907-2-15-20-75-14-11-0 (don’t ask us on how they came up with that product code!), the height of the pogo pins when fully pressed is about 240 mil (6.096 mm). This is the height of the shield under test from the pogo shield board. We are using a 6 mm spacer in our setup but with 6 mm we need to stack 2 pieces of the small retainer PCB as the shield under test is 1.60 mm in thickness.

Here’s how the pogo shield looks like when stacked on top of an Arduino Uno board:

From the image above, you might have notice that the pogo pins are not populated for the SPI section (ICSP header). Our shield under test (Reflow Oven Controller Shield in this particular case) does not use any of the SPI pins but if any other shield uses them, they can be populated. The bottom of the pogo shield has a matching footprint that fits a receptacle to allow access to the SPI port on the Arduino board (header connector on any regular Arduino board).

Once the shield under test is ready, it can be placed on top of the pogo shield and the small retainer PCB are used to hold it while testing takes place.

We also added some prototyping area and breakout headers for all the pins. They can be very handy when additional testing circuitry is required to perform additional test.
We really like our pogo shield a lot as it really helps in our testing process by making the process repeatable, fast and reliable although by no means as complete and extensive as Paul’s test jig for his awesome Teensy 3.0 boards.
The design files of the pogo shield are made available on our GitHub repository. Feel free to use them if you think it will help you especially if you are a small maker like us!
Take care!


Trackbacks & Pingbacks
[…] The team at RocketScream.com has a great post showing off their Arduino shield test rig. They run through the design decisions, and even offer up the design files so you can make your own test rig. Here at Rocket Scream, every boards are tested before being put on sale. When we first started, we have to admit we were awfully ineffective in testing each product that we made. Each test process was time consuming and our method could be described as primitive (imagine rubber bands…). […]
Leave a Reply
Want to join the discussion?Feel free to contribute!